
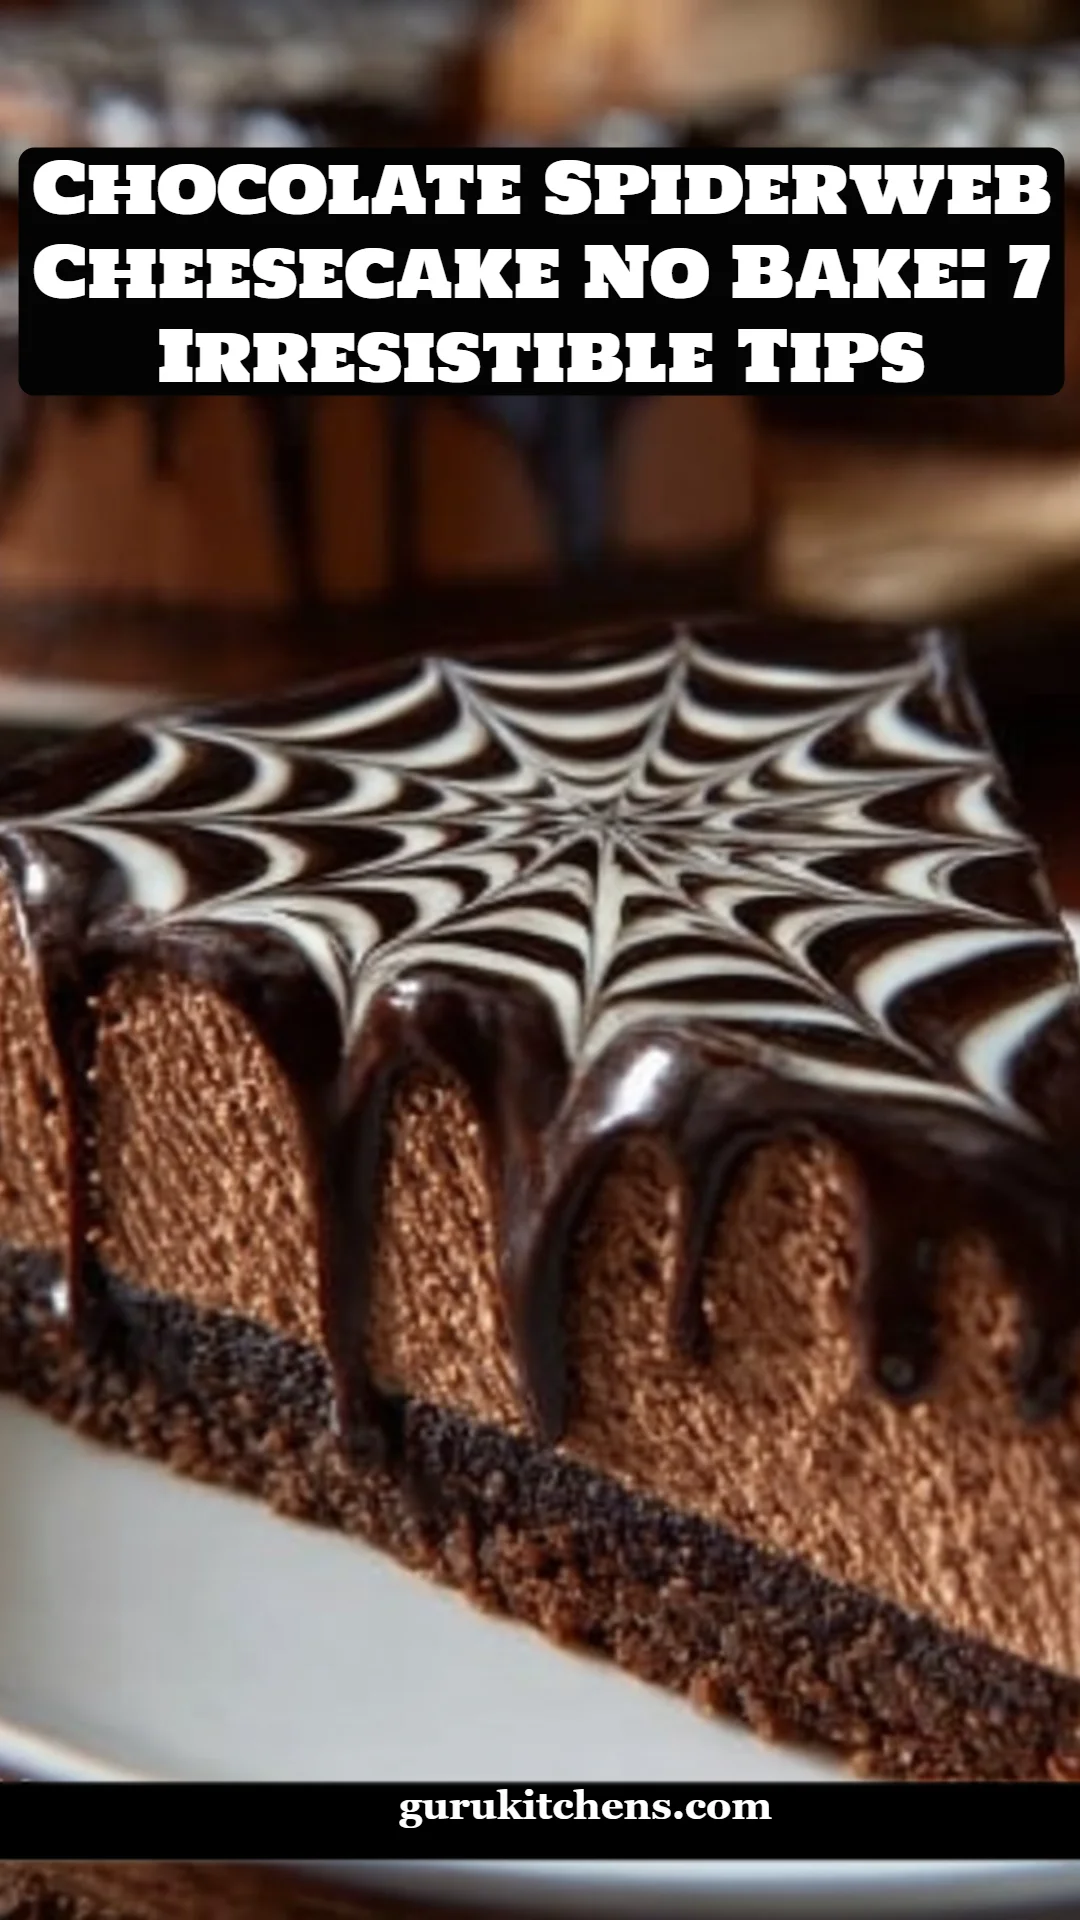
Irresistible No-Bake Chocolate Spiderweb Cheesecake: 7 Delicious Tips for Perfecting This Dessert Delight
Ah, the magic of dessert! There’s something so heartwarming about gathering around the table with family and friends, indulging in a treat that not only looks exquisite but tastes utterly divine. I vividly recall the joy on my daughter’s face the first time she laid eyes on my no-bake chocolate spiderweb cheesecake. It was her birthday, and she’d insisted on a spooky theme. That’s when I had a lightbulb moment: “What if I make a spiderweb cheesecake?” The combination of luscious cream cheese, rich chocolate, and a fun spiderweb design not just delighted her but also turned our kitchen into a hub of laughter and sweet memories.
The no-bake chocolate spiderweb cheesecake is unlike any ordinary dessert. With its creamy texture and decadent chocolate flavor, it provides a perfect balance of richness without being overwhelming. Plus, the appeal of not having to turn on the oven makes it a go-to recipe for any occasion. As we dive into "Chocolate Spiderweb Cheesecake No Bake: 7 Irresistible Tips," I promise to share my cherished secrets, which have been tried and tested over countless family celebrations. Prepare to elevate your dessert game with this utterly delightful cheesecake that’s not just about taste—it’s about creating lasting memories around your table.
What Are Chocolate Spiderweb Cheesecake No Bake: 7 Irresistible Tips?
The no-bake cheesecake has become a beloved variation of the classic dessert, making it incredibly accessible for bakers of all skill levels. Originating in America, this dessert skyrocketed in popularity during the 20th century, primarily for its decadent flavors and easy assembly. With each forkful, you’ll experience a delightful blend of creamy cream cheese and the aromatic allure of rich chocolate, creating a flavor profile that dances on the palate.
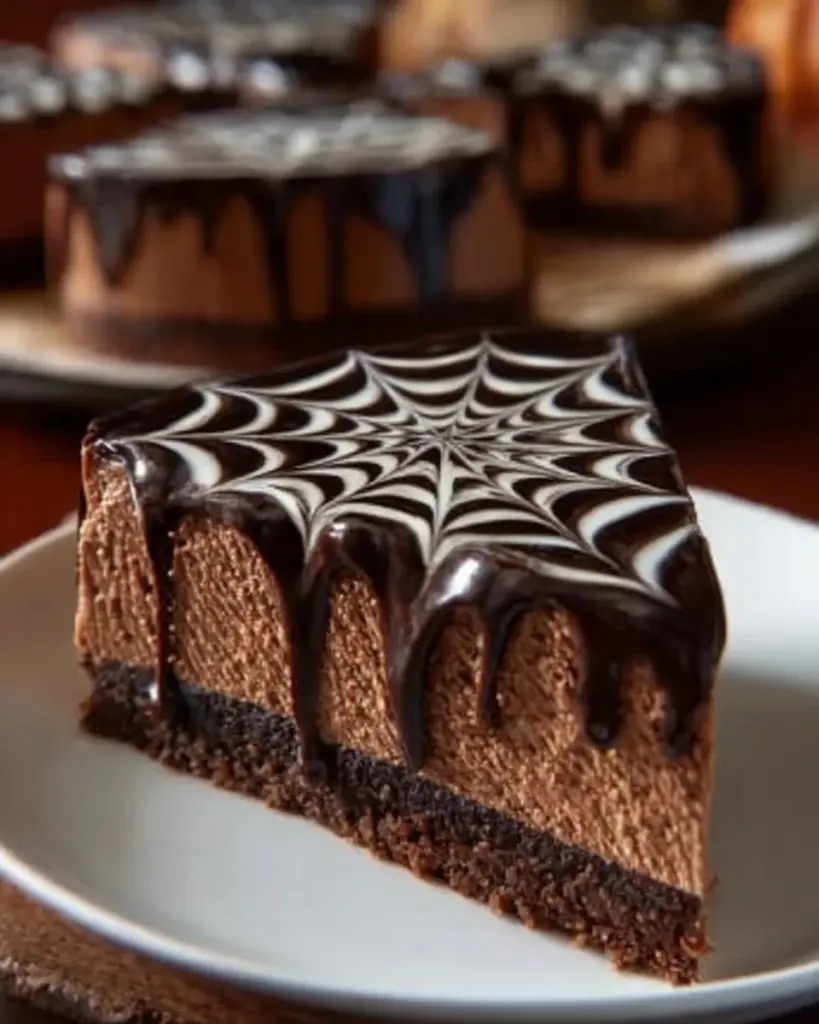
But what truly makes these cheesecakes stand out is the playful spiderweb design. With just a few simple techniques and chocolate syrup, you can transform an ordinary dessert into an eye-catching masterpiece. This recipe is perfect for Halloween gatherings, birthday parties, or simply an evening treat when you want to spoil yourself. The best part? Unlike some notoriously finicky baked cheesecakes, this no-bake beauty guarantees a smooth texture every time! Keep reading to discover seven tips that will make your no-bake chocolate spiderweb cheesecake an absolute showstopper.
Why You’ll Love This Recipe
Simplicity at Its Best: No oven required means no fuss! You can whip it up in no time, perfect for last-minute gatherings. I can’t remember how many times I’ve been in a pinch, and this recipe saved the day!
Cost-Effective & Accessible: All the ingredients are easy to find and reasonably priced. Instead of splurging on fancy desserts from a bakery, you can create this exquisite cheesecake at home—no one will guess it cost less than $20 to make!
Customization Opportunities: Want to cater to different taste buds? Feel free to switch out regular chocolate for white chocolate or introduce fruit layers. The possibilities are endless, and it’s a great way to use what you have on hand.
Impressive Presentation: The spiderweb design is not just fun; it turns your dessert into a conversation starter! It’s like a delicious work of art—perfect for impressing guests or making memories with your little ones in the kitchen.
Time-Saving Delight: With a chill time of just four hours, you can easily make this ahead of time. Spend your time enjoying life instead of slaving away, and your friends will love you for it.
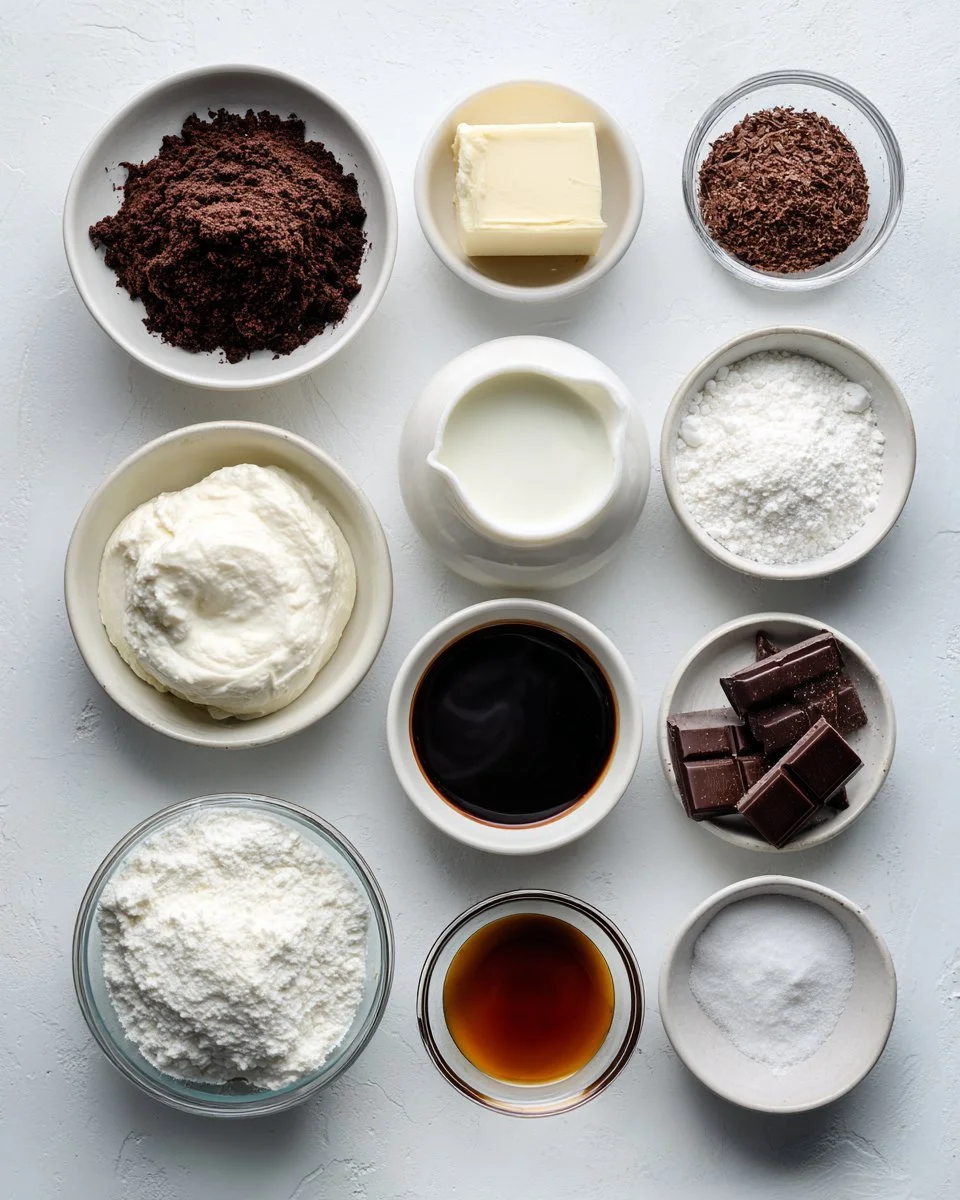
Ingredients
Here’s what you’ll need to create the most luscious no-bake chocolate spiderweb cheesecake:
2 cups chocolate cookie crumbs: I love using Oreo cookies for a rich and chocolatey flavor. You can also use gluten-free chocolate cookies if necessary.
1/2 cup butter, melted: Using unsalted butter is ideal, but if you’re in a pinch, salted butter works well, too.
3 cups cream cheese, softened: Make sure your cream cheese is at room temperature for a super smooth filling.
1 cup powdered sugar: This adds just the right sweetness.
1 teaspoon vanilla extract: For an extra aromatic touch.
1 cup heavy whipping cream: Whip this to stiff peaks for that light, airy texture.
1/2 cup chocolate syrup: Choose your favorite brand! It infuses sweetness and enhances the chocolate flavor.
1/4 cup melted chocolate for spiderweb: Use high-quality chocolate for a more complex flavor—dark or milk chocolate works best.
Consider storing your ingredients accordingly, making sure the butter and cream cheese are at room temperature before starting.
Step-by-Step Instructions
Prep the Crust: Mix the chocolate cookie crumbs with the melted butter in a large bowl until combined. It should look like wet sand.
Press & Chill: Firmly press the mixture into the bottom of a springform pan. Use a flat bottom to create an even layer. Chill for about 30 minutes to set.
Creamy Filling: In a mixer, beat the softened cream cheese, powdered sugar, and vanilla extract until smooth and creamy—this will take about 3-4 minutes.
Whip It Good: In a separate bowl, whip the heavy cream until stiff peaks form. You’re looking for that perfect, fluffy Whipped cream texture—about 4-5 minutes at a medium-high speed.
Combine Flavors: Gently fold the whipped cream into the cream cheese mixture until fully incorporated. Be gentle—you don’t want to deflate that fluff!
Pour & Smooth: Pour your luscious filling over the chilled crust and use a spatula to smooth out the top.
Drizzle the Fun: Drizzle the chocolate syrup in a spiral pattern over the filling. The spiral should be generous, as it will add that fantastic spiderweb effect.
Create the Spiderweb: Take a skewer or the handle of a spoon and drag it through the chocolate syrup to create a spiderweb design. Be creative!
Chill Time: Cover with plastic wrap and chill in the refrigerator for at least 4 hours or until set. The longer, the better!
Serve & Enjoy: Once set, carefully remove it from the springform pan, and serve chilled. Watch those forks fly!
Chef’s Tips: Ensure your heavy cream is very cold before whipping for the best results. Mix carefully, as overmixing could lead to a denser cheesecake.
Expert Tips & Tricks
Storage Recommendations: Store your cheesecake covered in the fridge for up to five days. If you have leftovers (which is rare, trust me!), they’ll keep well!
Make-Ahead Instructions: You can also make this cheesecake a day in advance, allowing the flavors to deepen and the layers to set perfectly.
Common Mistakes: Avoid over-mixing your cream cheese mixture—combine gently to keep it airy. A dense cheesecake isn’t what we aim for!
Use Quality Ingredients: High-quality chocolate and real vanilla extract can turn this dessert from ordinary to extraordinary!
Check for Set: After chilling, gently shake the pan to check for firmness; the center should be slightly jiggly but set.
Serving Suggestions
Pair your delicious no-bake cheesecake with a sprinkle of crushed chocolate cookies on top or a dollop of whipped cream for an extra treat! For an even more festive touch, serve it with fresh berries or a scoop of vanilla ice cream to balance the richness. This dessert is perfect for Halloween parties, cozy family gatherings, or even as a centerpiece for a birthday celebration. Who says you can’t enjoy dessert for breakfast too?
Variations & Substitutions
Flavor Variations: Think of swapping out the chocolate for caramel or adding a layer of raspberry or lemon curd for a refreshing twist!
Dietary Restrictions: You can easily adapt this recipe to be gluten-free by using gluten-free cookies and maybe even swapping cream cheese for non-dairy options.
Seasonal Variations: For a fall-inspired cheesecake, how about a pumpkin spice flavor? Just mix in canned pumpkin and spices with your cream cheese mixture for a seasonal treat.
Nutrition & Storage Info
Prep Time: 20 minutes | Chill Time: 4 hours | Total Time: 4 hours and 20 minutes
Yield: Serves 10-12
Estimated Calories: Approximately 300 calories per slice
Storage Instructions: Best stored in the refrigerator. It lasts up to five days when covered.
FAQ Section
Can I use reduced-fat cream cheese?
Yes, but the texture may be slightly different—usually lighter!What’s the best way to remove the cheesecake from the pan?
Run a knife around the edges before releasing the spring, and it should pop out easily!Can I freeze leftovers?
Absolutely! Wrap slices individually in plastic wrap before storing in an airtight container.What can I do if the cheesecake doesn’t set?
Don’t worry—you can re-whip and fold in some more whipped cream to stiffen the mixture and allow it to chill longer!Is there a way to make it vegan?
Definitely! Substitute cream cheese with a cashew-based cheese and use vegan cream.What chocolate should I use?
Choose a quality chocolate that you enjoy eating! Dark chocolate works beautifully.How long can I keep this cheesecake in the refrigerator?
It stays fresh for up to five days when properly stored.Can I use homemade cookie crumbs?
Absolutely! You can crush any chocolate cookies to make the crust from scratch!What toppings do you suggest for serving?
Fresh berries, whipped cream, chocolate shavings, or crushed nuts are all excellent!Can I make this without a springform pan?
Yes, you can use any pie pan, but make sure to line it with parchment paper for easy removal.

Conclusion
The no-bake chocolate spiderweb cheesecake is an enchanting treat that captures the essence of deliciousness and nostalgia in one beautiful slice. With these tips and tricks, I hope you’re inspired to create your own masterpiece to share with family and friends. I would love to hear about your baking adventures and any creative twists you put on this recipe! And don’t forget to check out my other scrumptious desserts on the blog—trust me, you won’t want to miss them!
Happy baking! 🍰
No-Bake Chocolate Spiderweb Cheesecake
Ingredients
Method
- Mix the chocolate cookie crumbs with the melted butter in a large bowl until combined.
- Press the mixture into the bottom of a springform pan and chill for about 30 minutes.
- In a mixer, beat the softened cream cheese, powdered sugar, and vanilla extract until smooth and creamy.
- In a separate bowl, whip the heavy cream until stiff peaks form.
- Gently fold the whipped cream into the cream cheese mixture until fully incorporated.
- Pour the filling over the chilled crust and smooth it out.
- Drizzle the chocolate syrup in a spiral pattern over the filling.
- Create the spiderweb by dragging a skewer through the chocolate syrup.
- Cover with plastic wrap and chill in the refrigerator for at least 4 hours.
- Carefully remove from the springform pan and serve chilled.